DETAIL ALERT: if your time is limited scroll quickly past this one!
I gave a four-minute PowerPoint Presentation today on one of my favorite subjects: oil painting. It was called "How to Paint a Masterpiece" and was based on my 200-hour effort to learn how to use a technique used by many Old Masters called "Verdaccio." (Note: The Verdaccio technique includes making a green-grey under-painting in perfect values upon which the artist applies color, often leaving the gray-green showing in the shadow parts of the subject, landscape or architectural areas.)
It probably wouldn't take most artists 200 hours to do one painting, but I did it the hard way: after getting well into the process I sanded down the whole painting and starting over a few times to push myself to make the most identical likeness and best quality product I could. Since I took a plethera of photos along the way it wasn't hard to find examples of most of the key steps in using the Verdaccio method, as I learned it from a talented instructor, Lynn Melman Weidinger.
Step 1: Select a master piece to "study".
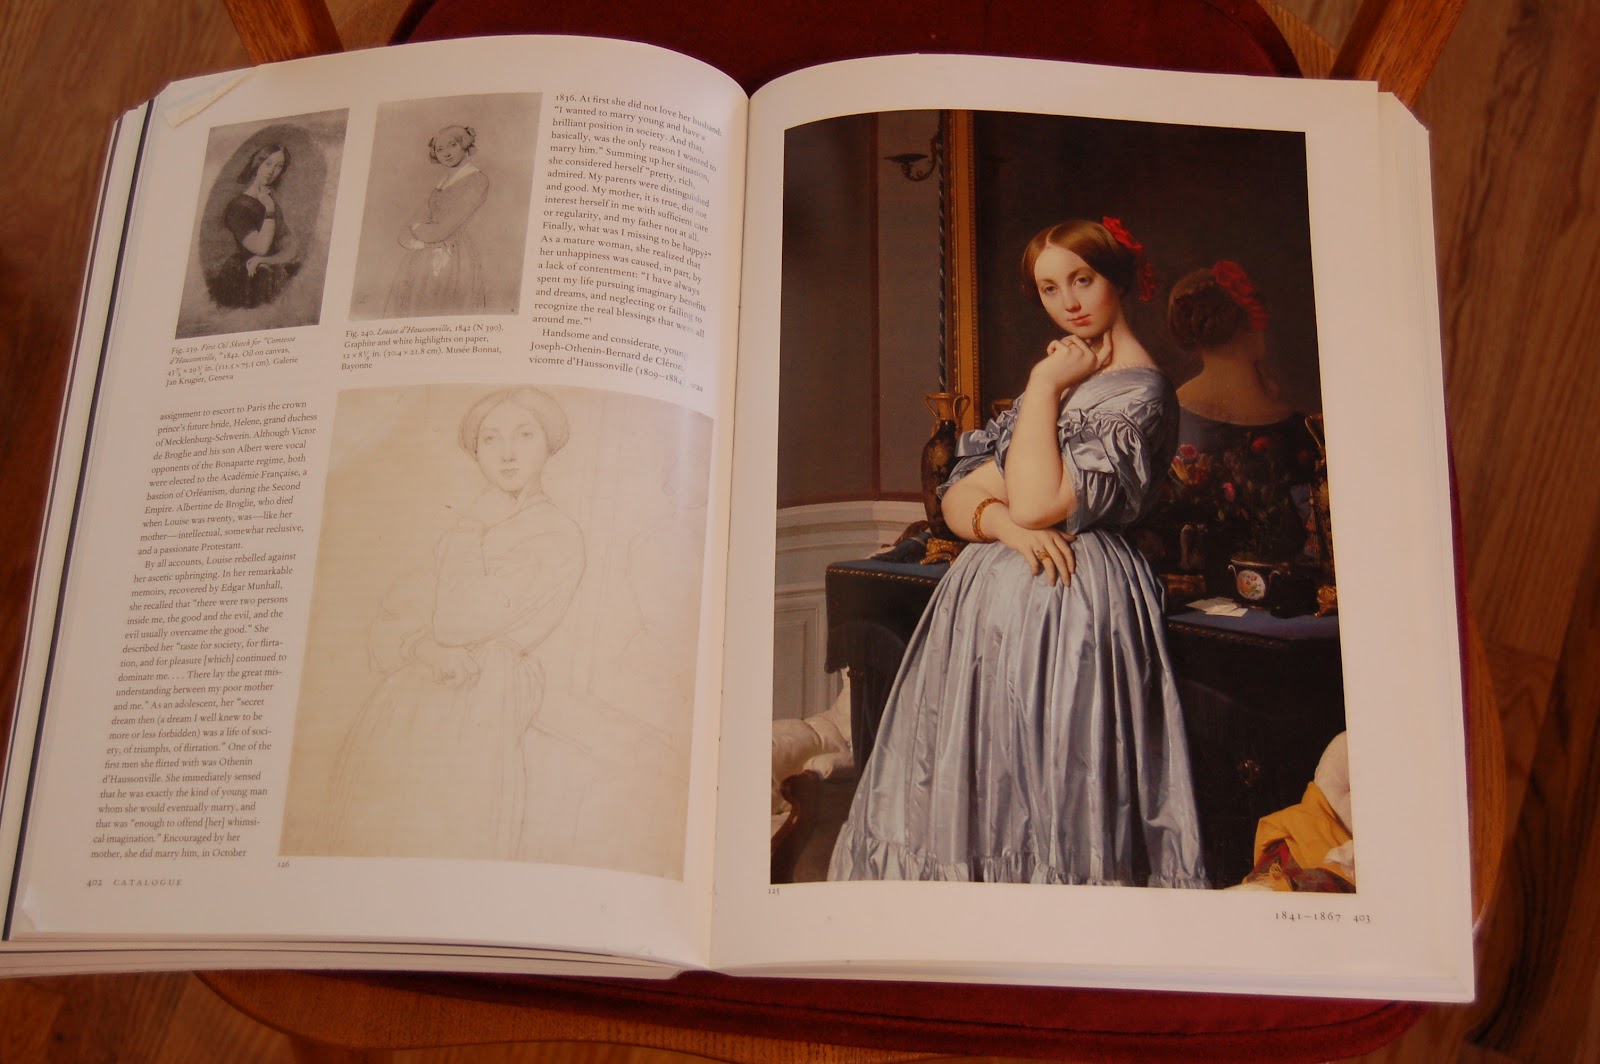 |
| This is a wonderful portrait by the master French painter Jean-Auguste-Dominique Ingres. |
The title is The Comtesse d'Haussonville, dated 1845. Oil on canvas.
Step 2: Cut an untempered Masonite board to the size you want your painting to be. I chose to make the painting 16"x20", a nice standard size. Roll white gesso on to create an acid-free barrier below your paints. I used gesso containing marble dust to allow some carving and building up of the surface.
Step 3: Enlarge the portion of the photograph that you want to study to the exact size of the painting you want to produce. This takes careful calculation to get the head large but usually not larger than life.
Step 4: Take a clear sheet of plastic the size of your painting and draw a grid on it with a red fine point permanent marker. Draw an identical grid on the gesso-ed board using a sharp charcoal pencil. Position the plastic over the to-scale print of your subject matter (See step 3). Make at least one cross-hair symbol near each of the corners of the plastic sheet and the enlargement print. Later put cross hair marks in the corners of the painting as well. These cross hairs should always match up when you are checking for accuracy. Carefully trace with a black fine point permanent marker the location of the important proportion points of the original painting. Clip or tape the plastic at the top edge onto the gesso-ed board so that it can be lifted up and down and folded behind the painting without it's shifting position. At first when I learned about making this reference on plastic I wondered if this step was cheating. As I went through the entire process I realized that if a person does not know know to paint humans well through considerable study and practice, this reference guide will only take them so far. Making this pattern becomes your reference guide to keep you from getting off track as you go through the painting process. You will pull it down over your painting to see if the eye is too small, the nose off center or any other important line off. In portrait work, unless you've done it yourself, you can't imagine how much difference a tiny mark in the right or wrong place makes. You must be an obsessive perfectionist to get a likeness.
 | |
| Guide lines on clear plastic to help bring you back when your painting strays...and there are so many opportunities to do that with this technique. | . |
Step. 5: Draw your subject with India Ink on the board. Use the guidelines for accuracy then erase them.
 |
| India Ink on gessoed board |
The next step (6) is one you hate to do. You are supposed to paint thin gesso over the inked drawing until you can barely see the drawing beneath. That locks in the base drawing in case you need to sand off some of the later layers and go back to your most accurate drawing. We don't want the strong ink to show through light areas of the subsequent layers of paint, therefore we tone it down. You may want to build up the gesso to give a three-dimensional quality to the painting. In other words, give
more gesso to the parts that are closer to the viewer: the right cheek, side of the nose, the lips, forehead, tip of shoulder and side of the hand.

Step 7: Draw the subject as accurately as possible using charcoal. When it is ready, spray it with fixative. I actually repeated steps 5, 6, and 7 a couple of times after not being happy with the way the drawing and the 3-D gesso were going. Starting over doubled the total painting time. You've gotta love it. It's not a race.
 |
| Charcoal layer |

Each time I moved the painting to a new stage: ink to charcoal to verdaccio I would lose the likeness and had to recapture it again.
 |
| Verdaccio layer. |
 |
| detail |
Step 9: Begin adding oil color--what you've been anxious to do-- matching the values in the verdaccio underpainting. Leave the face to last to avoid using too bright colors in the face. Here I start with the dress then go to the hair. The room light changes the color in the photographs.


Step 10: Finally! I can start adding the skin tones, what I've been anxious to do from the beginning. As is the whole point of this exercise, I'm trying to match the colors to the gray verdaccio values in the underpainting. The mixing of the skin tones is quite complicated and I cannot give you sufficient information here. I'll just give you enough information to convince you that it is complicated. There are four rows of colors you have to make for the skin: Gray Row, Complexion Row, Flesh Row and Extra Blood Row. Keep in mind that we are learning the technique of the Old Masters. My set of colors were recommended for the flesh palette for some "Mediterranean complexions" such as my Princess.
A. In making the skin tones I first made a "Gray Row" (A) in a value scale from 1 to 9 using Ivory Black, Titanium White and Zink Yellow. It is later mixed with paint from row B to create Rows C & D and make them more palatable for the face.
B. The "Complexion Row" on my palette is made of Winsor Orange (more red) and Cadmium Orange (more yellow) + Burnt Umber + Burnt Sienna in the darker values and +Titanium White in the lighter values. There is no gray in this row.
C. The "Flesh Row" is a mix of paint from the Complexion (B) with the corresponding values from the Gray Row (A).
C. Then there's a "Blood Row" of paints which is used for the warm portions of the face: the nose, cheeks, lips, ears, etc. My Blood Row began with Burnt Umber and Alizarine Crimson in the dark values and moved to Naphthol Red Light in the 4.5 value to white in the lightest value.
At this point I am feeling confused, rebellious and I suspect I'm being snookered by Left-Brained color-chart fanatics who own stock in oil paints. My nature is to just mix colors as I paint and not have any left over at the end of the day. I prefer to choose colors intuitively. Painting in Verdaccio is causing me a major angst: I am taking too long and my paints are drying between sessions. If I go for a few weeks without painting my paints dry and I have to mix more. I hate wasting paint! To help preserve them I put drops of olive oil and plastic wrap on my piles of paint after each session. I also put the paint palette in the freezer between uses, but I still found myself remixing. I tried putting the gray in numbered syringes with some success (see below). I also put my oils in empty paint tubes that I labeled, (you can see one below). Lesson: once you start, keep moving to completion.
 |
| These rows are not in the correct order. I would guess that this sequence from the top is Gray, Flesh, Complexion and Blood. |
,+crop.jpg) |
| These dabs were taken from my palette so that I could know what the paint was supposed to look like each time I had to re-mix it. |
 |
| Flesh is being applied. Notice that green remains in the shadow areas. Watch for green the next time you visit a gallery with classical figure paintings. In my final version I had made so many changes that I regretted the green was mostly obliterated. |
.JPG) |
| You can see the flesh paint being applied, especially to the arm and I've also started adding blood. Adding blue to the eyes was fun. The color looks bright after all this time working in gray. |
Step 11: Do the background. I struggled with this and tried out many variations before stopping for now with the one below. Overall, I'm pleased with what I learned and feel I grew in skill and knowledge of how far I could push myself. I look forward to doing verdaccio again. I am in awe with the talents of Mr. Ingres.
 |
| After 200 hours, this is the final painting (for now). I wouldn't be surprised if I work on the background again! Any suggestions??? |
.tif) |
The marble gesso base for the painting is actually 3-dimensional. You can feel the changes in height for the parts of the face that are closer to the viewer, such as the tip of the nose the lips and the cheek and forhead on our right. You can also see that the eye on the right, because it should look closer, is both brighter and darker than the one on the left.
And below is the original photo I was studying. My work didn't come out exactly like the original, but my Princess has developed a personality of her own and I'm OK with it.


